— 11 min read
Pull Planning in Construction: The Complete Guide to Backward Scheduling
Last Updated Jun 20, 2024
Last Updated Jun 20, 2024

Making projects more predictable and teams more collaborative doesn’t happen by chance. Those qualities need to be deliberately fostered — and should increase efficiency rather than come at the cost of it. That’s why many general contractors and project managers plan their projects using what’s known as pull planning.
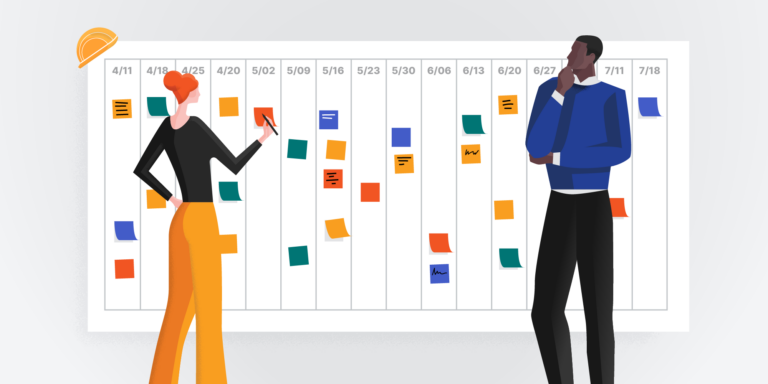
Pull planning is a scheduling technique that starts with an end goal and works backward to identify the steps needed to get there. In construction, the end goal is usually a key milestone, such as a scheduled date of completion or a specific segment of work. But rather than dictating required steps and timelines, pull planning generally includes team members in the planning process, which increases the quality of planning and the buy-in of everyone involved.
This article explores pull planning, how it differs from other types of planning, and what it looks like in practice.
Table of contents
Pull Planning vs. Push Planning
Planning in construction has traditionally been done through push planning, which is the opposite of pull planning. Push planning is a defining part of the Critical Path Method (CPM), which identifies key tasks and obstacles and uses them to define key milestones.
Push planning usually involves one team or one person doing most of the planning and delivering the information to the rest of the team, which can be quick but is often rigid and doesn’t give much of an understanding of how someone’s work fits into the larger project.
On the other hand, pull planning defines key milestones and plans backward from them, which can help identify inefficiencies and detect potential delays. Pull planning also enlists the help of team members in the process, which improves the quality of the plan by including their expertise and increases their understanding of how their work connects to the work of others.
The Principles of Pull Planning
Successfully executing a pull planning session requires a few mindsets that can change a team and a project.
Backward Planning
Pull planning keeps project managers from asking a common question during push planning: “What happens next?” That phrase is instead replaced with, “What needs to happen before the next activity can start?” With this reverse planning approach, they are able to stay focused on the deadline and quality of their end goal so they can proactively define steps to get there. Backward planning is extremely effective in reducing inefficiencies and identifying the need for contingencies.
Collaboration
Pull planning relies on getting at least one representative from each crew into the same room (physically or digitally) and getting their input into the planning process. Not only does this improve the plans by including the perspectives of people who are going to be doing the work, it also shifts the dynamic of the process. Suddenly, people are part of a team with an understanding of how their work fits into the project, which usually makes them more likely to increase their productivity and help generate solutions for conflicts and delays.
Commitment-Based Planning
Pull planning both requires and fosters accountability. Getting people in the same room to engage in planning is only effective if people are making realistic commitments and reliable promises. However, people are also building relationships, so they’re able to hold each other accountable once work begins. For example, if painting can’t start because the drywall hasn’t been sanded, the painting team knows the drywall team and is more likely to approach them effectively to find solutions.
Continuous Improvement
The routine of gathering team members at the beginning of projects offers a unique opportunity for everyone to understand and reflect on what works and what doesn’t. Pull planning gets team members engaged — sharing observations and providing feedback that allows for refinement of the planning and construction processes.
Preparing for a Pull Planning Meeting
Pull planning sessions are led by a facilitator, who is usually the general contractor or project manager. This person guides stakeholders through the process and should do a few things to prepare for the session.
Invite the right people.
Pull planning sessions usually need at least one representative from each team working on the project. This might include the general contractor, superintendents, foreman, subcontractors, designers and safety supervisors. A simple email with basic information on where and when can serve as an invitation.
Schedule it in advance.
Ideally, pull planning happens a month or two before the start of a big project, which gives subcontractors time to staff up, get materials, and adjust their plans. Of course, this isn’t always possible.
If a project starts in a few days and the full team has just been finalized, there’s still time to hold a pull planning session and get everyone on the same page. Pull planning sessions are always about investing time now to save it later.
Find the right space.
Pull planning usually requires a group of people mapping out a project on a wall, so it’s important to find a space that’s big and has a wall that’s as big as possible. Pull planning can also be done remotely through a video call, if necessary, though this can make it harder to foster engagement.
Get the right materials.
A pull planning session should have many stacks of sticky notes and pens or markers for people to map their tasks on the wall. Sticky notes are best because they can be moved as adjustments are made. Also, have a full set of the project’s drawings for reference. Digital tools exist that can help document the pull planning process and easily convert it into a schedule after the session.
And of course, people always appreciate coffee and donuts.
Consider removing the chairs.
The room is big and so is the board, so it might seem counterintuitive to remove the chairs, but this can be a clever way to increase engagement. Removing chairs puts people in an active stance to participate, as opposed to sitting back and letting others do the work. This does not apply to anyone who might struggle to stand for the length of the meeting.
Do advance research.
It might sound simple but the facilitator should have an understanding of the project and some of the processes needed to complete it. This might include having a rough idea of the duration of tasks or an understanding of common obstacles. This helps facilitators support team members while also pushing them to do their best work.
Give a good introduction.
Start off with an introduction that sets ground rules, explains how the process will work, establishes expectations, and gives an idea of how long the meeting will likely last. Clear expectations help people understand how to engage and make it more likely they will. For example, it is sometimes helpful to show an example task on a sticky note, so, for example, people know to put “Door assembly” instead of getting too specific and putting things like “Door handle” and “Door hardware.”
Be curious during the session.
During the session, facilitators should ask many questions, such as “Why do you think that’ll take that amount of time?” or, “What are the steps in that process?” Curiosity pushes participants on their thinking, possibly leading them to find new ways to do things. It also helps people in the room understand the process and the obstacles other teams might face.
Stay updated on what’s happening in construction.
Subscribe to Blueprint, Procore’s free construction newsletter, to get content from industry experts delivered straight to your inbox.

Pull Planning for a Whole Project vs. Segments
Pull planning for a whole project can get unwieldy and overwhelming, just based on the sheer number of tasks that need to be sequenced. Many general contractors divide a project into major parts and hold planning sessions for each. For example, a team building a new high rise might have sessions for structure, exterior, MEP (mechanical, electrical, and plumbing), and interior. The sessions are still collaborative meetings including stakeholders, but are now on a scale that’s more conducive to teamwork and communication.
The Pull Planning Process
The facilitator will usually lead the team through the following steps:
1. Establish project milestones.
Key milestones are commonly a date, such as a date of completion, or a specific segment of work, such as completing the foundation or building dry in. General contractors usually know milestones based on things like information shared by a client, the availability of an inspector, or the milestones of other connected parts of the project. The finishing milestone should be placed at the right side of the board. When using sticky notes, milestones are often turned so they are a diamond and can be differentiated from other parts of the board.
Here’s an example we’ll use throughout this section: A team could meet with the goal of completing the exterior envelope of a building. Key milestones might include the target date for completion, based on when the building is supposed to be dried in, and when the envelope can be started, based on the target dates of completion for segments, like framing, that need to be done first. The pull planning session will work backward from the goal within those dates.
2. Break down activities.
Move backward from a milestone to define what needs to happen to get there. Participants should begin to share their team’s tasks and write them on sticky notes. Oftentimes, teams color code their stickies to distinguish the work for which they’ll be responsible.
To continue our example: Participants identifying the actions needed to complete the exterior envelope might include the water test, installing glass, and sheathing. They would write those tasks and the amount of time estimated to complete them on sticky notes.
3. Sequence activities.
Spend time reflecting on the duration of each task and place them on the board, moving from the end milestone backward. Boards are often divided by weeks to help with scheduling. The sticky notes allow teams to make adjustments as necessary.
Facilitators should be particularly curious during this step, asking questions about how long things take and if there are other ways to complete a task. Participants should be looking for ways to increase efficiency by identifying tasks that can be done at the same time.
More from our example: The last action, and therefore the first thing to be placed on the board, is likely an exterior inspection or a water test. Participants will continue to sequence backward from there. They might find that the steel team and the glazing team can work at the same time, as long as the glazing team stays one day behind and focuses on parts the steel team has already completed.
4. Identify constraints.
After tasks and phases are laid out, the team should begin to identify places in the plan that might result in bottlenecks, be delayed by resource limitations, or face external constraints. Move the sticky notes around to allow for contingencies. This will help keep the project on schedule later on.
In our example: When working on an exterior envelope, a common issue might be a major storm that delays window installation. The team might decide to allow some flex time to avoid unexpected delays.
5. Assign responsibilities.
Participants should be clear on their team’s responsibilities and deadlines before they leave the session. However, it’s also best practice to send an email after the meeting thanking everyone and sharing the resources that were created.
6. Document everything.
Document the board by taking pictures and using the plan to create a schedule or add to the master schedule. The schedule can be shared with stakeholders to be referenced and updated throughout the project. Sharing the schedule with the client can be a valuable demonstration that the job is being approached thoughtfully and thoroughly.
If possible, keep the board up. If it was done on a piece of butcher paper, roll it up and tuck it away. These can be valuable references and reminders to the team of the commitments they made.
7. Monitor and Adjust
Track the progress of the plan and the project. As the project develops or delays come about, adjust the plan so people have an updated reference of the project’s status and how they fit in.
Pull planning can change the jobsite.
Pull planning is part of The Last Planner System (LPS), a project management system that includes people who are going to be completing tasks and helping to plan them out. LPS comes from lean construction, a school of thought that looks to increase efficiency by looking at projects holistically. However, the collaboration from pull planning doesn’t just increase efficiency — it can also help team members feel valued and bought-in to a project in ways that translate to higher quality work and stronger partnerships on future projects.
Was this article helpful?
Thank you for your submission.
100%
0%
You voted that this article was . Was this a mistake? If so, change your vote here.
Scroll less, learn more about construction.
Subscribe to The Blueprint, Procore’s construction newsletter, to get content from industry experts delivered straight to your inbox.
By clicking this button, you agree to our Privacy Notice and Terms of Service.
Categories:
Tags:
Written by
Colton Stokwitz
Colton Stokwitz is a Program Manager at Shoreline CPM. Based in San Diego, Colton spent 11 years working as a project controls manager, lead interior superintendent and senior cost analyst at Turner Construction. He has a Bachelors of Science (BSc) in Construction Management from California Polytechnic State University-San Luis Obispo.
View profileJames Hamilton
70 articles
James Hamilton is a writer based in Brooklyn, New York with experience in television, documentaries, journalism, comedy, and podcasts. His work has been featured on VICE TV and on The Moth. James was a writer and narrator for the show, VICE News Tonight, where he won an Emmy Award and was nominated for a Peabody Award.
View profileExplore more helpful resources

Types of Construction Specifications: Understanding the Difference
On a construction project, the specification book, often referred to as the “spec book,” typically contains detailed descriptions of the materials, products, systems and workmanship required. The design team —...

Constructability Reviews: Moving From Design to Reality
Before concrete is poured or hammers are swung, a construction project requires the proper scrutiny to determine if the project is even possible. This is where a constructability review comes...

Virtual Design and Construction: Technology for Building the Future
Technology is transforming industries from the medical field to the world of entertainment. And construction — although a historically slow industry to adopt change — is no exception. Today, there’s...

Deciphering Construction Drawing Symbols
In construction, every blueprint and drawing is a complex web of information, distilled into symbols and lines that determine the work executed onsite. For those in the field, understanding these...